I gave a presentation at Synthfest on November 9th, 2024 in Burlington, Massachusetts. This workshop is related to my ongoing research in using Pure Data as a tool for computer-assisted composition, sound processing, and sound synthesis. Specifically, the presentation is on how to use Pure Data to create polymetric beats. A hackable template is available below for download. You can hear such beats in my most recent album, Rotate (Bandcamp, Spotify, Apple, Amazon).
Pure Data is often used as a tool for sound synthesis or signal processing. A quick history lesson reminds us however that it is also a robust tool for algorithmic, or computer-assisted composition. Pure Data is an open source visual programming environment for sound and multimedia. It is strongly based upon the programming environment Max. When Max first added the ability to process and generate audio and video, it was referred to as Max/MSP/Jitter to highlight these new abilities. However, going back to the very beginnings of Max, originally developed at IRCAM in 1985 by Miller Puckette (who also developed Pure Data), it was centered on interactive, algorithmic and computer-assisted composition.
Defining the Problem
In order to create polymetric beats in Pure Data, it is useful to think of two steps in the process. The first is how do we represent musical patterns in a way that is easy to codify for computers. The second is how do we read that pattern in such a way that we can fire off a MIDI note at the correct time to realize that pattern.
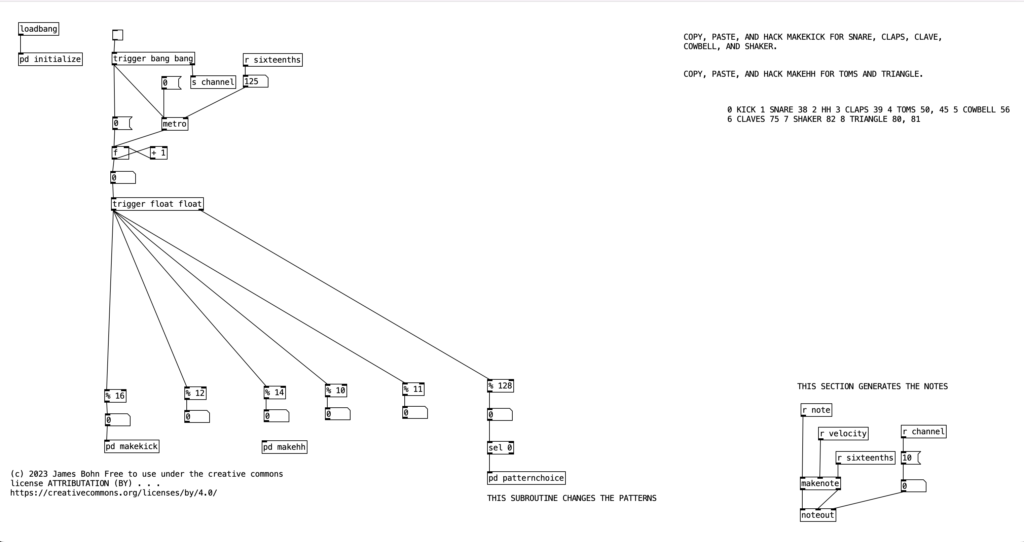
Attached to this blog post is a program shell that we will use to understand a basic process where patterns are defined and initialized, a time structure, a structure for evaluating whether a note should happen, an algorithm for firing off a note, and a structure for changing musical patterns. The way this program shell is designed, it currently only generates kick drum parts in common time. However, once we learn how this algorithm works, we can hack it to create far more complicated beats.
Defining a Pattern
Generating rhythmic content using an algorithm is a very useful exercise, as we do not have to worry about pitch material. On the most basic level, we could think of a measure of as being a list of sixteenth notes (or whatever the fastest pulse of the desired rhythm is), and we can express the rhythm by using zeros where notes do not happen, and ones where notes are played. Thus, if we want to define a four on the floor kick drum part in common time, we could express it as . . .
1 0 0 0 1 0 0 0 1 0 0 0 1 0 0 0
When we define tables in Pure Data, the first number indicates where in the table we’re putting the values. Typically, we would want to start at the beginning of the table, which would be position 0. Thus, from now on in, I will start every rhythm description with a 0, resulting in . . .
0 1 0 0 0 1 0 0 0 1 0 0 0 1 0 0 0
This is pretty basic. If we wanted to go a bit more advanced, we could imagine two different options, a normal kick drum, which we’ll represent with the number 1, and an accented kick drum, which we’ll represent with the number 2. If we want to accent beat one of the measure, we now get the table description . . .
0 2 0 0 0 1 0 0 0 1 0 0 0 1 0 0 0
Notice, it would be pretty easy at this point to use the number zero for when notes do not occur, but use the MIDI velocity number(1-127) to indicate when a note should occur. Doing this, you can get very finely tuned dynamic drum parts. However, such subtlety is not for me, I’m more of a boom / bap / boom-boom / bap guy myself, so I will be sticking with accented and unaccented notes. Let’s look at this table definition as it occurs in the program shell. To get there, double click on the object labeled pd initialize, which is below loadbang . . .
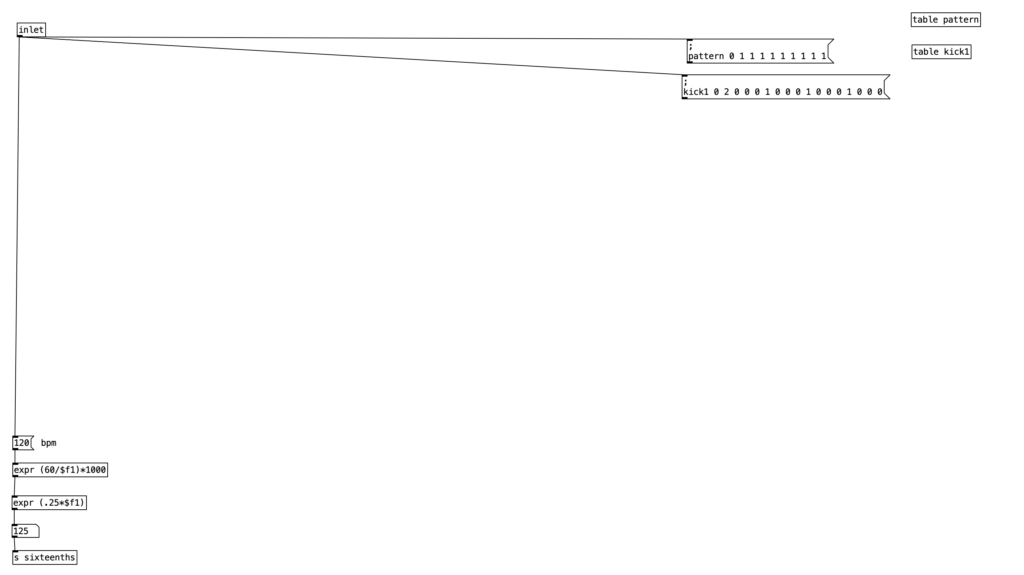
For those who are relatively new to Pure Data, loadbang designates algorithms that execute when you open the program. Likewise, any object in Pure Data that starts with the letters pd are subroutines. Double clicking them allows you to view and edit the algorithm contained inside the subroutine. Subroutines are a great way to declutter your screen, and to create algorithms that you may want to copy and paste into other programs you create. Note that the subroutine pd initialize also sets the tempo, translates that into milliseconds, and then into sixteenth notes (still expressed in milliseconds). Finally, we also see that pd initialize contains a definition for a table called phrase, but we’ll get to that later.
Changing Patterns
Before we get to how to use this kick drum pattern, I want to introduce one more level of complexity. In the long term it would be useful to define several different kick drum patterns so we can change patterns every eight measures or so to have a dynamic drum part. As we start to add more layers to the drum part (snare, high hat, toms, etc.) it would also be nice if some of those layers occasionally did not play at all, so the combination of layers also change as we move from phrase to phrase.
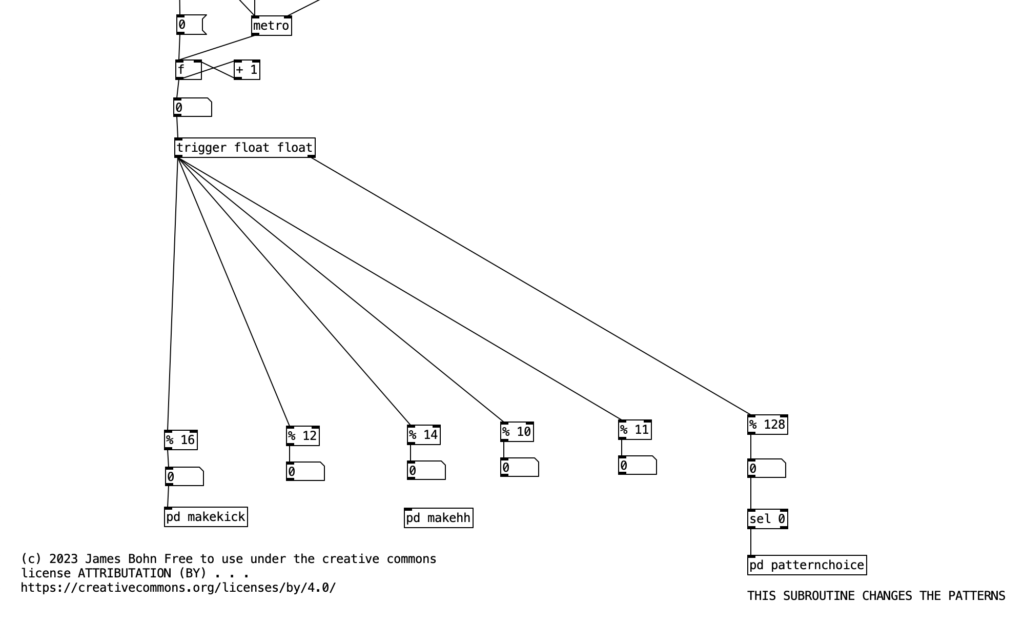
For the purposes of this algorithm, I’m going to allow for each layer of the drum part to select between three patterns (1, 2, & 3). Furthermore, I’ll also include a fourth possibility of 0, which would correspond to no pattern playing. In order to see how this is implemented in our algorithm, let’s look at the counter mechanism beneath the main metronome object. Beneath this metronome we see a trigger object, and beneath that, we see an object that states % 128. This is modular mathematics, which limits the value to a number between 0 and 127 (inclusive). We then feed the outcome of this to an object that states sel 0. When this object receives a 0 in its leftmost inlet, it will send a bang to its leftmost outlet. We then send this bang to trigger the subroutine pd patternchoice. Musically, what this means, is that the subroutine pd patternchoice executes at the beginning of every eight measure phrase. Since we are thinking in terms of sixteenth notes (8 x 16 = 128), a 0 would indicate the beginning of a phrase.
If we look inside pd patternchoice, we see two structures that are currently not connected to the inlet. In time we will copy and paste these structures, changing some of the numeric values, and connect them to the inlet. We will make these changes as we add more layers and patterns to our drum beat. However, for the time being since we only have one kick drum pattern, neither structure is connected to the inlet.
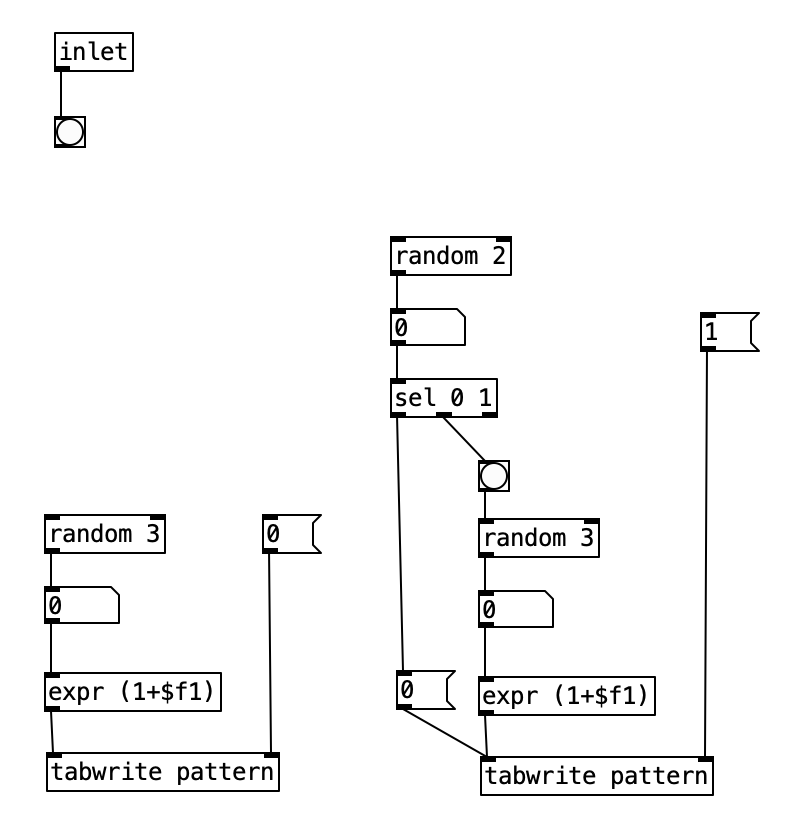
We will treat the algorithm on the left as being connected to the kick drum, while the algorithm on the right will eventually be used for the snare drum. Notice there is a difference between the two structures. The one on the left is simpler, and if we follow what it does, we figure out that that algorithm will write a 1, 2, or 3, but not a 0 to the table pattern in position 0. The structure on the right however, will write a 0 to the table patttern at position 1 half of the time. To put this into musical terms, the difference between the two means that kick drum will always be playing a pattern, while the snare drum will only play a pattern 50% of the time.
Firing Off a Note
Now lets see how pattern and kick1 are used to either fire off notes or not. We see at the bottom of the screen a makenote object connected to a noteout object that performs the final task of sending a midi note out. However pd makekick is the subroutine that determines whether or not a kick drum should occur at a given point. Above pd makekick we see the object % 16 which comes from the counter. This object mods the current counter to a number between 0 and 15 inclusive. These values correspond to the number of sixteenth notes in a measure of common time. Thus, when we return to the number 0 after the number 15 occurs it corresponds to returning to the beginning of the measure.

When we look at the structure pd makekick a lot of the heavy lifting of the subroutine is handled by the object spigot. Spigot receives numeric values through its leftmost inlet. However, it only passes those values through to its outlet if the numeric value being fed to its right most inlet is not zero. Thus, we can think of spigot as a valve that shuts off the flow of numbers when the rightmost inlet is zero. We can use this to selectively shut down the rest of the algorithm, which will effectively stop it from making notes.
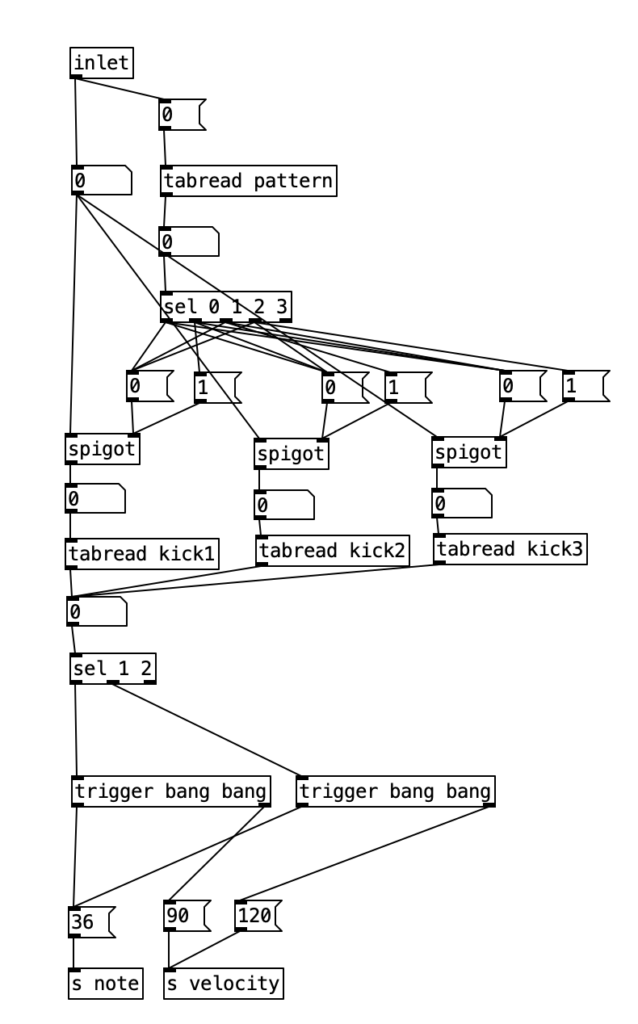
The first step is to determine whether a pattern should be playing or not. Likewise, at the same time we can determine which patterns should be playing if one occurs. To do this, we’ll read the value of pattern at array position 0 (which we’ll use to store the current kick drum pattern). We can then route the output of that to a number of different outcomes using a sel statement. Each outcome of the sel statement sends either a 0 or a 1 to the rightmost inlet of three spigots. These spigots correspond to the three possible kick drum patterns. Thus, when the pattern is 0, a 0 is sent to all three spigots, effectively shutting off the rest of the subroutine. When the pattern is 1, we send a 1 to the spigot for pattern one (turning it on), and a zero to the other two, making sure any previously used pattern is turned off, and so fourth.
Once we pass through one of the spigots, we encounter the part of the subroutine that determines whether a note should be fired at any given time. Underneath each spigot is a tabread object that reads the current position of a given pattern (kick1, kick2, or kick3, respectively). This will return the result of a 0, 1, or 2, corresponding to no note, normal note, and accented note. Since we don’t have to do anything when no note is played, we can simply ignore that result. All we have to do is correctly route the results for 1 and 2. Since all three patterns will be outputing 0, 1, and 2, we will treat those three results the same, we can route the output of each tabread statement to the same number box, and then route the results using sel 1 2. Both results will sending the number 36 to s note (36 is the MIDI note number corresponding to a kick drum), and will send a velocity of either 90 or 120 to s velocity.
Understanding Execution Order
In order to understand the mechanics of this, we have to understand a little about execution order for Pure Data. When an outlet branches off in several directions, Pure Data first executes the connection that was created first, regardless of where it is placed on the screen (in Max, it executes from right to left). When an algorithm branches off in this way, it travels all the way down until it hits the end, and then Pure Data goes back and executes the other branch of the algorithm. When an object has multiple outlets, it typically executes the rightmost outlet first (following it all the way down the algorithm) before it most to the next outlet.
Alternately, when an object has several inlets, the object typically does not spring into action until the leftmost inlet is triggered. We can think of new values that are connected to inlets that are note the leftmost inlet as queueing until the leftmost inlet is triggered. This order of execution in Pure Data allows non-crossed connections to fire in the correct order. To illustrate, imagine an object with two outlets and an object below with two inlets (similar to the makenote / noteout algorithm below). Furthermore, let’s imagine that the right outlet is connected to the right inlet of the object below, and the left outlet is connected to the left inlet of the object below. First, the value from the right outlet will queue at the right inlet of the object below, then the left outlet will send its value to the left inlet, triggering the object below.
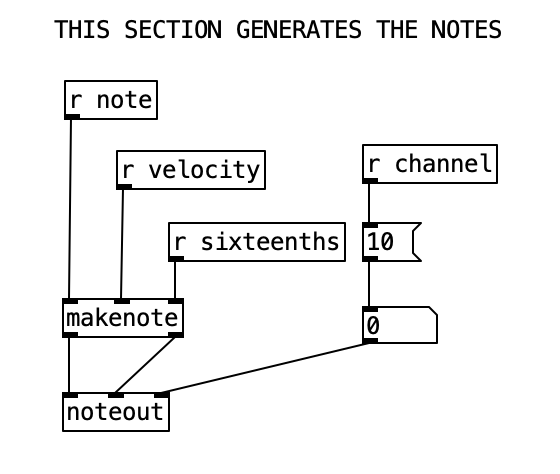
However, whenever we start to make complicated algorithms, it can be confusing to see in what order the algorithm will flow. When we want to force a specific order to achieve a specific outcome, or simply to make order clear, we can use a trigger object. A trigger takes a single inlet, and uses it to trigger several outlets (including the option of passing the inlet to one or more outlets) in a specific order. That order is (you guessed it, right to left). We will use this to control the order of sending the velocity and sending the note number.
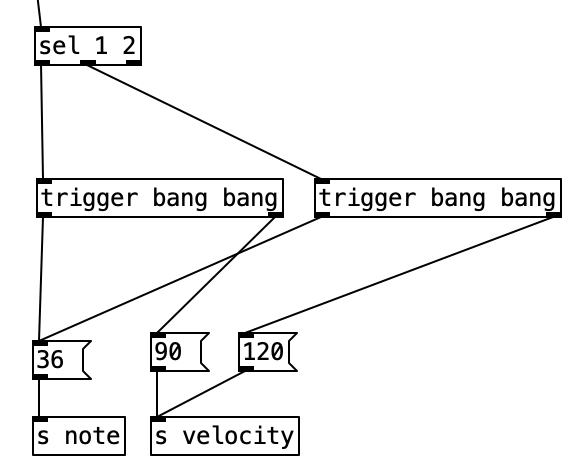
The makenote object has three inlets that correspond to midi note number, velocity, and duration expressed in milliseconds. Since midi note number is the leftmost inlet, we have to send that value last. This means we have to send the velocity before we send the note number. Here we do not have to worry about duration, since duration is often irrelevant when triggering drum samples. Thus, we can set a duration of a sixteenth note during the initialization process.
Hacking the Shell
With the knowledge we have gained thus far, we are now equipped to start hacking the program shell. A good place to start would be to double click [pd initialize], copy both the object [table kick1] and the corresponding message that populates that table. You can then paste these objects, move them so they don’t overlap, change both to say kick2 instead of kick1, and change the numbers in the in the kick2 message to be a different pattern. Again, your pattern should only use the numbers 0, 1, and 2. Likewise, the table should be 17 numbers long with the first number being 0, in order to denote that we’ll load the array starting at the beginning. You can then connect the kick2 message to the [inlet] object.
Now do the same process again creating a table and message for kick3, making sure to connect the kick3 message to inlet. Now, we can finally make use of the subroutine [pd patternchoice] in the main algorithm. Double click on [pd patternchoice], and connect the outlet of the bang to both the [random 3] object and the message that contains the number 0. Now, when we run the the algorithm, we should hear the kick drum pattern randomly change once every eight measures.
Now we can get into the good stuff. Let’s add a snare drum part. First, we should decide what meter we want to use for the snare drum. For the purposes of this demonstration, let’s put the snare drum in three. We’ll start by copying the object [pd makekick] and pasting it. More the copied object under the [% 12] object, and connect the outlet of [% 12] to the inlet of the copied object. Let’s also rename the copied object to [pd makesnare].
We have to change some details of [pd makesnare] to get it to make a snare part. Double click the object and change the message box near the top from 0 to 1. Change the array names in the three [tabread] objects to be snare1, snare2, and snare3. Finally, right above the object [s note], change the number in the message box from 36 to 38 (the MIDI note number for snare drum).
Now, double click the object [initialize], and copy the three kick drum tables, as well as the three messages that define those tables. Paste those items, and move them so they don’t overlap with other items. change the array names to snare1, snare2, and snare3 in both the table objects and the messages that define the arrays. Now, let’s change the patterns. Since these are patterns that are in three, they will feature 12 sixteenth notes. Thus, each message will have to include 13 numbers, the first being the number 0 to indicate that the pattern is loaded at the beginning of the array. Again, use 0 to indicate no note, 1 to indicate a note, and 2 to represent an accented note. Make sure you connect each of the three messages to the inlet.
Now we need to allow the snare patterns to change, so let’s double click the subroutine [pd patternchoice]. In this subroutine we need to connect the outlet of the bang to both the [random 2] object and the message that contains the number 1. The [random 2] here yields a 50% chance that the snare appear in a given phrase. The [random 3] below that will select one of the three snare patterns when it is determined that the snare should appear in a phrase.
If we wanted to make a percussion part that used two different MIDI notes, we should look at the subroutine, [pd makehh]. Two notes are required for a high hat part to allow for closed and open high hats. If we look inside pd makehh, we see that the patterns allow for five possibilities, 0, 1, 2, 3, & 4. When we look at the sel statement near the bottom of the screen, the number 0 does not appear in it. Again, this is because 0 means do not play a note, so we can simply ignore that result. The way this is setup, 1 and 2 are closed high hats with the latter being accented, while 3 and 4 are open high hats with 4 being accented.
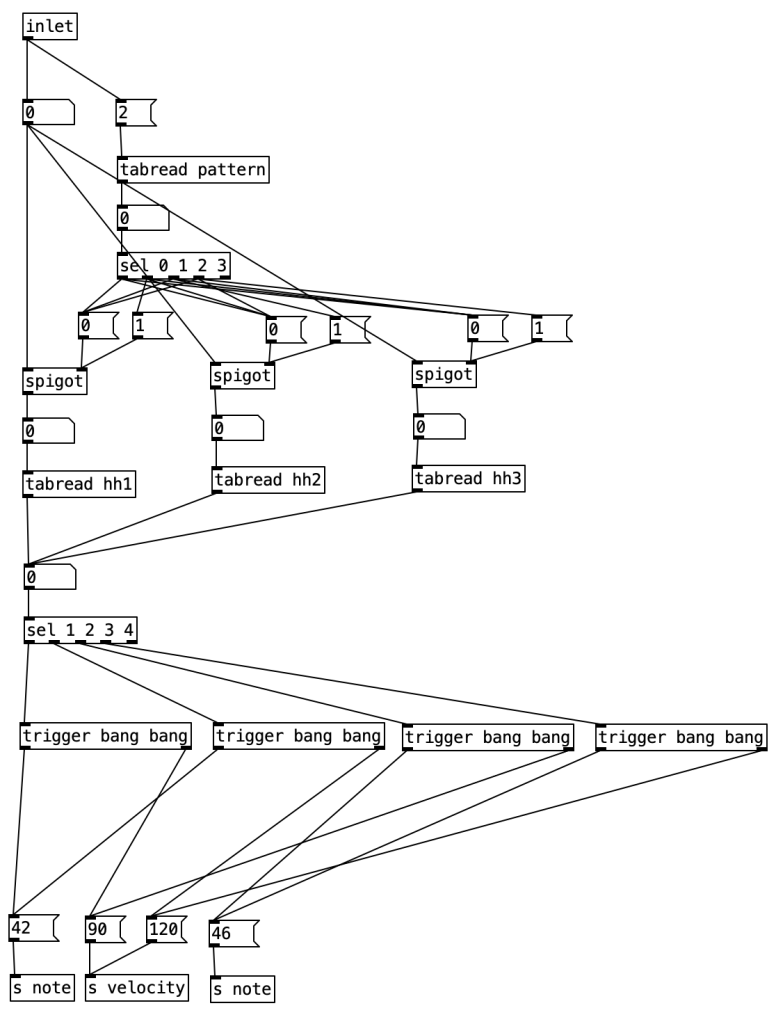
If we wanted to fully implement this subroutine, we’d have to attach it to one of the meter generators, % 16, % 12, % 14, % 10, or % 11. Then we would have to create three patterns (hh1, hh2, hh3) in [pd initialize], remembering to make the table, and use a message to populate it. You would populate the patterns using only the numbers 0, 1, 2, 3, and 4. Then you’d have to copy the block of code inside of pd patternchoice that we used to choose the pattern for the snare drum, paste it, change the index in the message object to 2, and connect the random object and the index message to the inlet.
We could also adapt [pd makehh] for creating a subroutine that will generate a toms or conga part consisting of a high tom / conga and a low tom / conga. You would have to remember to use a new / different index number to store the pattern, and change the MIDI note numbers to those corresponding to either the a high tom or conga and a low tom or conga. Ultimately we can continue in this vein, creating increasingly complicated drum beats, using [pd makekick] as a means creating layers of single note percussion parts, and [pd makehh] as a model for creating percussion layers using two different notes. As the number of meters used increases, you’ll find the resulting beats get increasingly funky, and take longer times to evolve in compelling ways, enabling you to inject rhythmic interest into your music.
