Experiment 2: Analog Style


May has been a busy month for me. Thus, my second experiment in my project funded by Digital Innovation Lab at Stonehill College investigates the use of the preset patch Analog Style (designed by Critter and Guitari). To be specific, I am using a WARBL wind controller with EVI fingering to control the patch. I am using the breath control on the WARBL to control the cutoff frequency of Analog Style (using MIDI controller 24).

Due to the busyness of the end of the semester, this experiment features no original programming on the organelle. However, I did create a program in Pure Data to create accompaniment and drive the EYESY. To accompany the experiment, I used the H.E.A.P, the Housatonic Electronic Algorithmic Philharmonic. This a fun, frivolous name I’ve given to a small, battery powered synthesizer / sampler setup I’ve assembled for live performance. It consists of three synthesizers / samplers: a Volca Sample 2 (which provides 10 channels of late 1980s style lo fidelity digital sampling), a Volca Keys (which can be used as an analog monophonic or 3 note polyphonic synthesizer), and a Volca FM 2 (which is a clone of the 1980s classic, the Yamaha DX7, the best selling synthesizer of all time). I’ve also begun to think of the EYESY, as we’ll see later, as part of the H.E.A.P.

I won’t go into great detail about the program that generates the accompaniment for Experiment 2, as I have other blog posts that go into detail about various algorithms included in the program. Ultimately, the program is intended to generate relatively generic, but fairly usable R&B esque slow jams. The music is in common time using sixteenth notes. The portion of the program including and beneath % 16 (mod 16) ensures that the resulting music will have 16 pulses per measure. Likewise, the instrumentation and musical patterns change every four measures. This is enabled by the part of the program including and beneath % 64 (four measures of sixteenth notes adds up to 64).
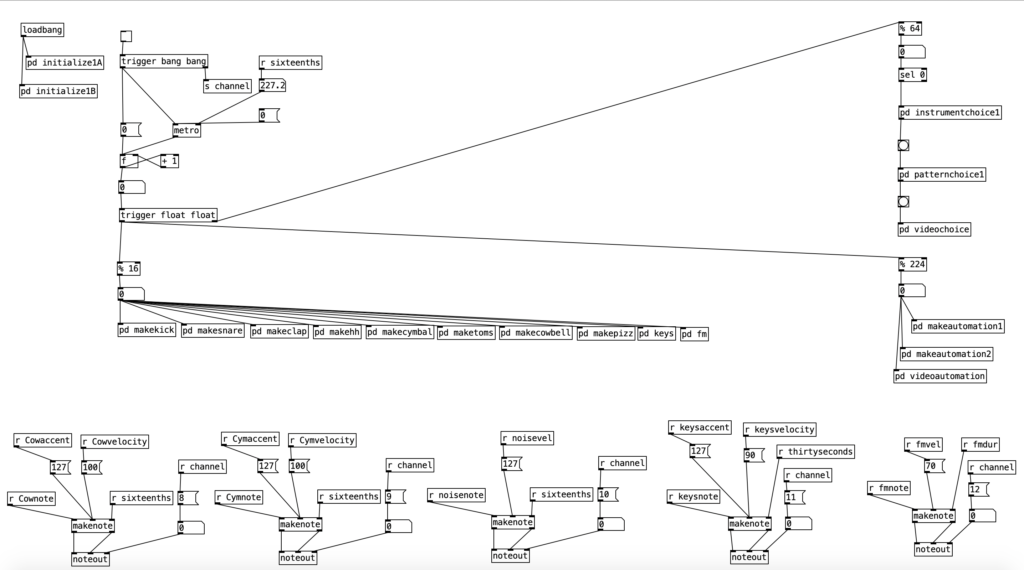
The Volca Sample is being used to provide the drum beat, and some string pizzicato (see pd makepizz). The Volca Keys provides some synthesized bass patterns that run two measure loops. The Volca FM provides four chord, four note chord progressions that repeat every two measures. To create these chord progressions I used some music programming techniques that I’ve covered in a previous blog entry, though in this experiment I am use the brass friendly key of G minor.

One of the newer programming tricks I used in this program is an algorithm designed to drive the EYESY. While the EYESY generates hypnotic, interactive video animations, left to its own devices it can get a bit repetitive fairly quickly. In order to generate anything that seems even remotely dynamic some one needs to perform the EYESY by rotating its five knobs. This is an impossibility for any performing musician, save for a vocalist. Thankfully, we can do the equivalent of turning the knobs on the EYESY through MIDI using controllers 21 through 25.

The algorithm I’ve created to drive the EYESY is designed to make slow, evolving changes. To control these changes I’ve created a table called videostatus. It consists of five positions that contain a one or a zero to denote whether changes should be make or not made to a given knob during the current four measure phrase.

The subroutine pd videochoice is triggered at the beginning of every four measure phrase. It generates five different random numbers that are either a zero or a one. These results are then stored in the table videostatus.

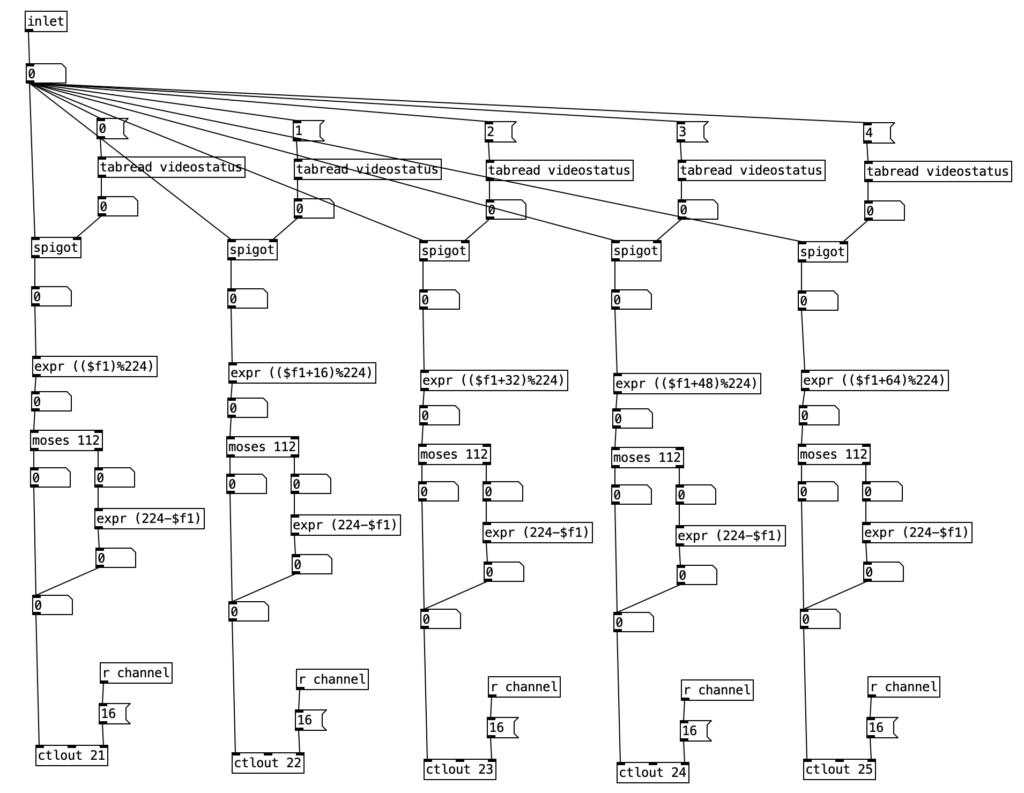
The subroutine pd videoautomation updates the knob positions on the EYESY once every sixteenth note. It is passed the current sixteenth note number modded by the number 224, which corresponds to 14 measures of sixteenth notes. The subroutine contains five nearly identical columns, each of which corresponds to each of the five knobs on the EYESY. First the algorithm checks the current states of each of the five positions of videostatus table. When that value is one, that allows the current sixteenth note number to pass through the spigot. This value is passed through an expr statement that displaces the sixteenth note number. The column corresponding to knob one is not displaced, but each subsequent column is displaced by one measure (16 sixteenths), which is then modded to stay between 0 and 224. The statement moses 112 is used to determine whether we should be counting up to 112, or counting down to 0. This is accomplished by having numbers that are greater than 112 to pass through expr (224-$f1), which causes the result to get small as the input value is increased. The result of this is then passed to one of the five controller values (21-25) on MIDI channel 16 (the channel I’ve set my EYESY to).
Since I went over the mother patch in the previous experiment, I’ll start with going over main.pd for the Analog Style patch. We can see that knob one controls the tuning of the patch, while knob two creates an offset frequency for a second oscillator. The third knob sets the resonance of the low pass filter, while the fourth knob (the one I am controlling using the WARBL) sets the cutoff frequency of filter. To learn more about what low pass filters are, check out my blog entry on Low Pass Filters in LogicPro. However, to summarize briefly in relationship to the WARBL, when the amount of breath coming through is low, that in turn sets the cutoff frequency to be low as well, resulting in less sound (and only low frequency sound) to come out of the Organelle.
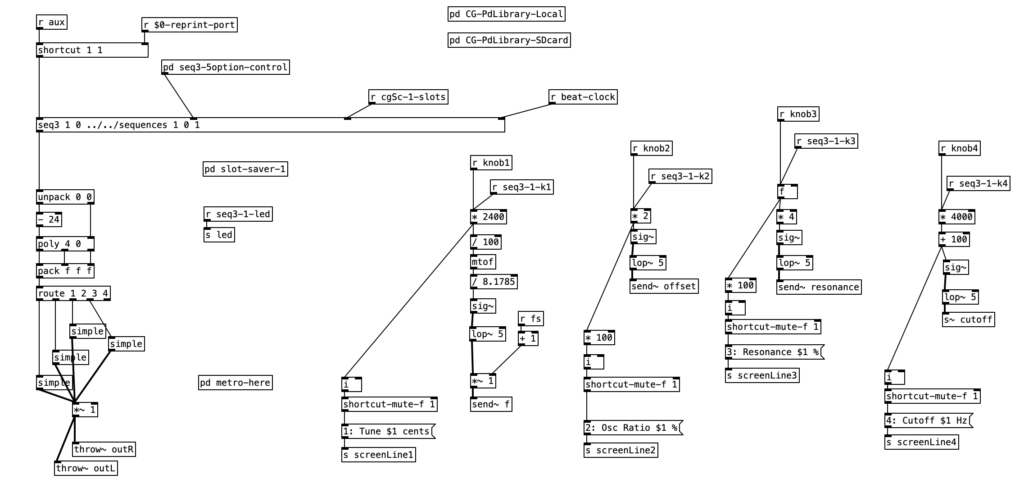
We can also see that this patch allows for sequencing when the aux button is down. However we will not go through how sequencing works today. We will however go into simple, which is the subroutine that creates the sound. We can see two oscillators, blsaw, in this subroutine that generate sawtooth waves. For more information on subtractive synthesis waveforms (including sawtooth waves), check out my blog entry on Subtractive Synthesis Waveforms in Logic Pro. One of those two blsaw oscillators is modified by the offset of knob two. The mixture of these two oscillators is passed to a low pass filter, moog~. This object also receives a center frequency to its center inlet, and a resonance value to its right most inlet. The outlet of this object is then attenuated slightly, *~ .75, before being sent to the subroutine’s outlet.

Again, I’ve found that the accompaniment generated by experiment.pd to be generic, but also fairly usable. It should be relatively easy to change the tempo, phrase length, or any number of musical patterns to create music that is stylistically different. Also, I enjoy slow evolving nature of EYESY generated video. I feel that turning on and off changes to various combinations of the five knobs add a degree of subtlety that aid in the dynamic nature of the video.

I am disappointed in my performance on the WARBL. I am still getting used to the EVI fingering on the instrument, so there are some very sour notes from time to time. However, I am very pleased with the range of the WARBL, as well as the subtle breath control the instrument provides. The fingering makes jumping octaves and fifths very easy. In future experiments I hope to get into hacking existing Organelle patches. I also plan to come up with variants of the videoautomation algorithm to create more sudden, less subtle changes to the EYESY’s settings.

Low Pass Filter Demonstration

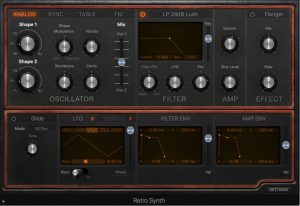
Of the various filters used in subtractive synthesis, the low pass filter is by far the most commonly used. Accordingly it is useful to examine how this filter alters sound. To that end, I’ve made a couple of videos that demonstrate three different filters in Logic Pro’s Retro Synth instrument.

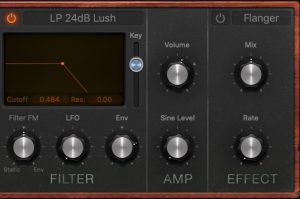
Before getting too deep in the process, I’ll start with some basic information. A low pass filter attenuates frequencies above a set center frequency. Filters are often described in terms of their slope, that is the amount that higher frequencies are attenuated. Slope can be described in terms of decibels per octave. Thus, a 24dB filter dampens frequency content by 24 decibels per octave. To put it another way if the center frequency is set at 100 Hz, audio at 200 Hz should be attenuated by 24 decibels, while audio at 400 Hz should be attenuated by 48 decibels. Thus, the higher the slope, the more effective the filter is at attenuating filtered frequency content. Slope can also be described in terms of poles, which translates out to 6dB. Accordingly, a 24dB filter is also called a 4 pole filter, while a 12dB filter is called a 2 pole filter.

The three filters demonstrated in these videos are a 24dB low pass (described as being Lush), a 12 dB low pass (described as being Creamy for some unknown reason), and a 6dB low pass (described as being Lush). Each is demonstrated with a 4 second, 55 Hz sawtooth wave (A1, where C4 is middle C). In each pass, the center frequency is swept up from the lowest to the highest frequency setting for the filter. Thus, we hear harmonics add in over the course of four seconds.

Additionally, these videos also demonstrate how the filters in question respond to difference resonance settings, which begs the question, what on God’s green earth is resonance? Resonance feeds the audio at the center frequency of the filter back through the filter. At moderate settings this can allow harmonics to be accentuated when the center frequency matches the frequency of a sound’s harmonic. At very high settings quality analog filters self resonate, which means they produce a sine wave at the center frequency even when no sound is patched into the filter. Because resonance creates a peak at the center frequency, it can increase the perceived slope of a filter. Each video features nine passes, three for each filter (24dB, 12dB, and 6dB respectively). The first pass of each group features no resonance, while the second has the resonance set at 50%, and the final has the resonance set at 100%.

What do we learn from these videos? While it would be technically incorrect to say that these filters all self resonate, we can say that they are coded to emulate self resonating filters, so for all intents and purposes, these filters are functionally self resonating. Thus, when the resonance is turned up to 100% we hear a sine tone sweep up the entire frequency range of the filter in addition to the filtered 55Hz sawtooth wave. Furthermore, we can see that sweep in a linear fashion in Logic’s graphic equalizer, confirming it responds in a linear fashion in pitch space, or exponentially in frequency space. The resulting wave form is basically a sine wave laid out over the structural form of a longer period sawtooth waveform. One odd thing we notice is that the 12dB (Creamy) filter peaks severely when the resonance is turned up to 100%. I found this to be true at every key velocity.

We also hear that the filters effectively accentuate harmonics when the resonance is set at 50%. This allows us to hear the exponential curve of the filter. As the center frequency moves up linearly in terms of octave pitch space, it accentuates increasing numbers of harmonics as the more harmonics are grouped within an octave as you sweep up the frequency range.

We can also hear and see how much more effective the higher slope filters are than the lower slope filters. We can see how the higher slope filters effectively squelch higher frequencies when the center frequency is low. Likewise, we can see how much more curved the output waveform is when the center frequency is low.

Here we can see the waveforms as each filter is tested . . .

Here we see the spectral analysis of each tone as evolves in Logic Pro . . .

So Much Noise

Did you know that there is a technical definition of noise? Did you know that there are six main colors of noise? The most common type of noise is white noise, which consists of random fluctuations such that there is equal energy content per bandwidth. This can be thought of as being similar to a flat frequency response. Pink noise consists of random fluctuations with equal energy per octave. Brown (also called Red) noise consists for random fluctuations where the energy level of each bandwidth is related to the squared inverse of the frequency (1/f2). When listening to these three types of noise, it sounds like pink and brown noise are progressively lower in frequency than white noise. That is because more of their energy is concentrated in lower frequencies in comparison to white noise.

Blue noise features energy levels that are proportional to frequency, resulting in a 3dB increase per octave. Violet (or Purple) noise utilizes energy levels that are proportional to the square of the frequency, resulting in a 6dB increase per octave. When comparing blue and violet noise to white noise, they will sound higher in frequency than white noise, as increasing amounts of their energy is concentrated in higher frequencies. Finally, Grey noise is basically white noise that has been filtered to correspond with equal loudness curves, so that the while the energy level of each bandwidth will not be measurably equal, but will be perceived by human beings as being the same loudness.

To demonstrate white noise, I generated four seconds in Logic Pro’s Retro Synth. You can listen to the results below. On the first pass, the waveform is displayed in Audacity, on the second pass it is displayed as a spectrum in Logic Pro.

Subtractive Synthesis Waveforms in Logic Pro’s RetroSynth

If you’re like me, you may wonder, how accurate are the waveforms in LogicPro’s RetroSynth subtractive synthesis emulator. It turns out, they’re pretty accurate. I tested the sine, triangle, sawtooth, square and pulse waves. At first glance, RetroSynth seems to only offer triangle, sawtooth, square, and pulse waves (noise as well, but that’s for another day) . . .

However, if you look at the amplifier portion of the emulator, there is a knob labeled “Sine Level.” Thus to get a sine wave, you have to pull down the filter CF all the way to the bottom, and pull up the Sine Level . . .

For the test I put in a whole note with a key velocity of 100 for each waveform. I used the note A1 (middle C=C4), resulting in a 55 Hz tone. You can see and hear the results in this video . . .

Note however that there are some weird artifacts during the square wave, which come from data compression.

Those of you who know your waveforms know that a sine tone is a pure tone that has no overtones (harmonics). A triangle wave is a sum of all the odd harmonics, where the fundamental is harmonic 1, with the amplitude of each partial is 1/(n squared). A sawtooth wave features all harmonics with an amplitude of 1/n. A square wave includes all the odd numbered harmonics with the amplitude of 1/n. A pulse wave is a variable square wave, and the harmonic content is reliant upon the width of the pulse. I used a graphic equalizer in Logic Pro to display the harmonic content of each waveform.